
GODIAG GT108 is an OBDI to OBDII universal converter to convert the OBDI diagnostic interface of cars, trucks, tractors, mining vehicles, generators, boats, motorcycles, individual ECU control units, etc. into standard OBDII diagnostic interfaces through DIY wiring Interface.
It is convenient for car maintenance personnel to connect to OBDII diagnostic programming equipment for data stream reading, fault code diagnosis, programming, activation and coding…

GT108 has 3 configurations:
A configuration is for cars, SUVs, pickup trucks, motorcycles.
B configuration is for trucks, mining vehicles, generators, boats.
C configuration includes both A and B configuration.
How to Use Godiag GT108?
Steps:
1. Find the definition of the diagnostic interface (find the maintenance manual of your own vehicle, or search online.), or see the definition diagram of the corresponding diagnostic interface of the GT108 manual.
2. According to the interface definition, find out the connection line needed by your car, and connect to the GT108 adapter according to the definition. (Use a screwdriver to lock the terminal.)
3. Connect the connected diagnostic cable to the vehicle OBD1 diagnostic interface according to the definition. (Connect GND 4 or GND5 first, and then connect BAT+. If the power cable is connected correctly, the POW light of the GT108 host will light up. If the vehicle diagnostic interface does not have power, please connect the car battery to the DC power connector of GT108 with the battery cable. If the vehicle needs the ignition signal, connect the O-IGN line, and press the IGN switch, the corresponding IGN light will light up, and the O-IGN line will output the ignition power signal.)
4. Connect the communication line CAN or K-line to the diagnostic interface. (Note: If it is the truck diagnostic software added by the car diagnostic equipment, you need to buy a GT106 24V to 12V adapter.)
5. Connect the diagnostic device to start diagnosing the vehicle.
Note: If you cannot find the definition for your own vehicle diagnostic interface, you can first find out the power supply of the diagnostic interface. First use the black battery clip on the battery connection cable to connect the negative pole of the battery, and then use the BAT+ line to connect to the diagnostic interface to find the power supply. You can also use a multimeter to find the diagnostic interface power supply. The definition of the diagnostic interface can also be judged by the GT101 Pirt Electric Circuit Tester device.

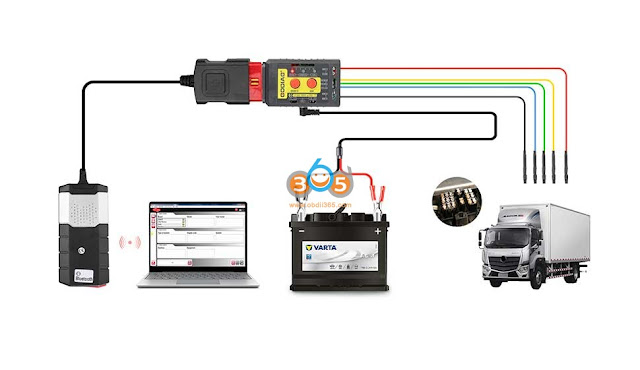
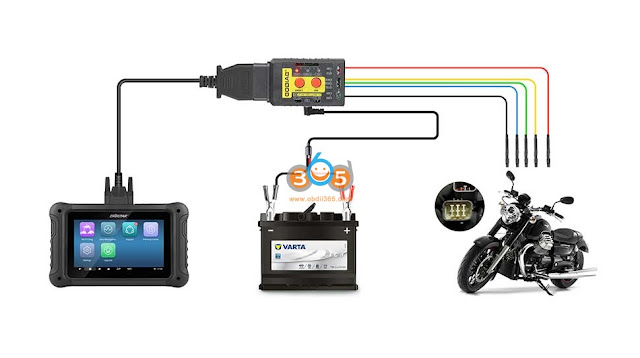
Godiag GT108 wiring connection examples:
Connect with cars


Connect with Trucks


Connect with Motorcycles

Connect with Mine Vehicles, Tractors, Boats and Generators


Connect with ECU modules

Some wiring diagrams from Godiag GT108 manual


View more on Godiag GT108 user manual
Comments
Post a Comment