
GODIAG GT100 and CAS4 Test Platform Test BMW CAS4 Key

 GODIAG GT100 with GODIAG CAS4 CAS4+ Test Platform can not only perform key programming (add new key and all keys lost), but also synchronize test and troubleshooting. This post will share the guide to use it to test whether the programmed key synchronizes with CAS4/CAS4+ module before installing the module back to the car.


All devices required:

GODIAG GT100 OBD2 Break Out Box ECU Connector

GODIAG CAS4 CAS4+ Programming Test Platform

CAS4 or CAS4 module

BMW Key

godiag-gt100-and-cas4-test-platform-1


Connection:

Firstly, connect GODIAG CAS4 Test Platform with CAS4/CAS4+ module

godiag-gt100-and-cas4-test-platform-2


Next, plug CAS4 CAS4+ Test Platform connector to GODIAG GT100 directly
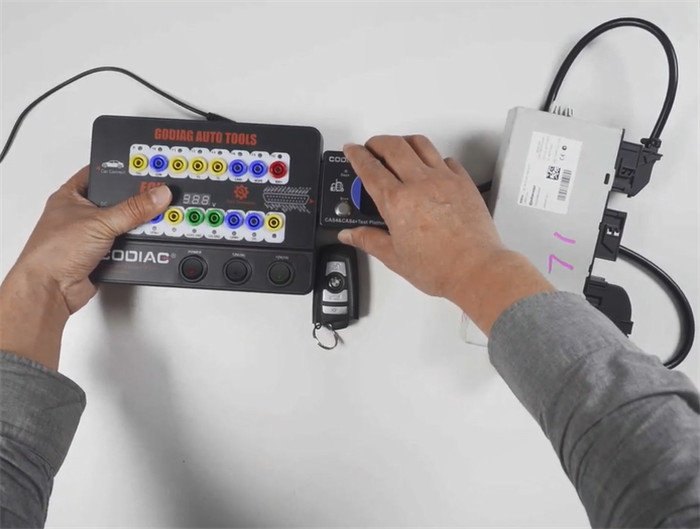
godiag-gt100-and-cas4-test-platform-3


Then fasten the screw of test platform

godiag-gt100-and-cas4-test-platform-4


Finally, supply power to GODIAG GT100, and turn on “POWER” and “12 V (30)” button

godiag-gt100-and-cas4-test-platform-5


Main operation steps:

1.When the key synchronizes with CAS4 CAS4+:

Plug the key into the coil of GODIAG CAS4 Test Platform

Then the CANL, BAT+, CHAS GND, SIG GND and CANH indicators will be on

godiag-gt100-and-cas4-test-platform-6


But the CANL and CANH indicators will turn off immediately. The reason is that the “Start” button of CAS4 test platform has not been turn on.

godiag-gt100-and-cas4-test-platform-7

Once press the “Start” button, the “Dash” indicator will be on and the corresponding indicators also turn on.

godiag-gt100-and-cas4-test-platform-8

Press “Start” button to turn off and then turn on again

After 4 or 5 minutes, the data transmission will be closed

godiag-gt100-and-cas4-test-platform-9

When remove the key from CAS4 test platform, it will resend the data and the corresponding indicators will be on.

godiag-gt100-and-cas4-test-platform-10


2.When the key doesn’t synchronize with CAS4 CAS4+:

When it is out of sync, there is no response after plugging the key.

The indicators are also off and the data will not be sent.

godiag-gt100-and-cas4-test-platform-11

Even though press “Start” button, the indicators will go out


That’s all!

More tutorials of GODIAG GT100 with CAS4 test platform are coming soon!

Stay tuned!


www.godiag.co.uk

Comments

Popular posts from this blog

Godiag GD101 J2534 vs Openport 2.0

  Openport 2.0 and godiag GD101 J2534 which is a better J2534 passthru device?   Let’s take a look at the comparison table first. Item Openport 2.0 Godiag J2534 / VNCI NANO J2534 Protocols CAN 2.0 CAN/ISO15765 and K-line KWP2000/dual K-line ISO15765, ISO9141, ISO14230, J1850 PWM, J1850 VPW ELM327 mode – ELMConfig, ScanMaster, AlfaOBD, FiatECUScan  ECUFlash Yes for Mitsubishi and Subaru – Honda HDS Yes Yes Toyota Techstream Yes Yes JLR SDD Yes Yes Forscan Yes Yes Renault Clip Yes Yes Benz Xentry Passthru Yes Yes BMW ISTA+ Yes Yes Nissan Consult 3+ Yes Yes VAG ODIS Yes Yes GM GDS2 Yes Yes J1979 Tester – Yes Subaru SSM4 Yes Not tested PCMFlash Yes Yes Operating system Windows XP/Win 7/Win10, better 32bit Windows 8/10/11, 32/64bit (driver not recognized if use Win7/WinXP) Firmware Update – Yes,  How to update Godiag J2534 firmware? Connection USB USB In sum: Both cables are cheap and better keep both. Godiag J2534 /VNCI J2534 also works in ELM mode. It is compatible with...

How to Modify GODIAG GD101 / VNCI J2534 Nano ?

Here is the DIY modification tutorial for Godiag GD101 or VNCI J2534 HS-CAN + MS-CAN. Simply modification for GODIAG GD101 / VNCI J2534 Nano . Just add a slide switch and remove the two resistors. For me, a simple solution without an adapter. Maybe it will be helpful for someone. Remove R59 and R60 resistors. Add switch 2 position ON 6 pin. Tested with AlfaOBD App

How to Set up Honda HDS 3.105 with Godiag J2534?

  Has anyone successfully set up Honda HDS 3.105.034 with a   Godiag GD101 J2534   cable on Win10? Sharing our customers’ installation experience. How to Set up Honda HDS 3.105.034 for Godiag GD101? 1. Download and install the driver for the gd101 cable. 2. After installing the driver,  be sure to check for updates to the built-in Firmware! The cable had firmware version 1.8 after purchase and the utility updated it to the latest version 1.14. Those who say that this cable is buggy probably did not update its built-in firmware, but used the one that came from the store. 3. Install the HDS. If the car model is before 2017, then use the old HDS. if it is newer, then use i-HDS. These are different HDS versions. Version/year/month/day of release HDS 3.017.012 — 10/15/28 — for Windows 8 and below HDS 3.101.019 — 07/16/22 — for Windows 8 and below HDS 3.102.008 — 02/17/22 — for Windows 10 and above HDS 3.102.029 — 07/17/17 — for Windows 10 and above HDS 3.102.051 — 03/18/1...